

Marker track: What is it and how we use it in our recordings
- Evmorfos Kasinakis

- 2 Απρ 2018
- διαβάστηκε 3 λεπτά

I think that many times you are feeling confused working on a project and you don’t know where verse begins or the chorus or even if you want to add a bridge after the second chorus and you are just scrolling the cursor back and forth until you find the spot you want to edit.
There is a way to be more efficient and more faster on working our projects by using a tool called Marker track. Marker track is just what its name defines. You add markers in your project so you know exactly where exactly each part of your song is ,like your verse ,where your chorus begins etc.
Now let’s insert a marker track in our project. It’s very simple. From the Menu bar you choose Project and then the sub menu. Add track and you pick Marker. A marker track is added with a grey line across your project , so you can know where to add markers. Marker track can be placed above your midi or audio tracks or between them. This is up to you.
Now let’s say you want add a marker in the second bar where the introduction of your songs starts. From the tool menu ,you choose the pencil and on the second bar you are clicking once and a marker is created immediately! You can also create a marker holding the Ctrl command and clicking once on the bar you want. As you can see a marker with the number 1 is created, as long as you haven’t added another track in this project before. With these two ways you can continue and add as many markers you want to the bars you want. Every marker you add has its own number.

Now how can we use this marker track properly so we can work faster and more efficient? First of all you can name each marker and this will appear in your project window. This function helps us to have a better point of view in each part of our song. There are two ways we can use to name the markers. The first one is easy and simple by left clicking once on the marker. On the info line above the project window there is a window called Name. You can add there how you want to name the specific marker. The first marker as you can see in the picture below is named Intro. You can continue and name all your markers in your project. The second way is form the menu bar ,choosing Project and from there the sub menu Markers or you can simply use the key command Ctrl+M if you are using p/c or Command+M (for Mac users). In the new window that appears you can see at your right the tab called Description. You can name there all your markers by double clicking.

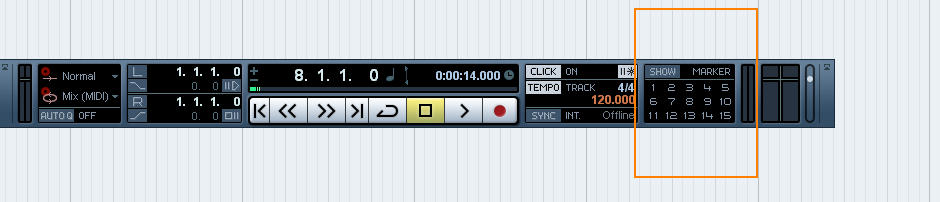
Now we have set all the markers we want in our project and the next thing we need to know is how we can move from one marker to another whenever we want. There two easy ways to achieve this The first one is, if you double click on the marker you want the cursor comes automatically on this marker. The second way is using the transport panel. As you can see there is a window called Marker with 15 numbers.From there you can manage your fifteen first markers, if you have so many markers of course. Clicking on the number you want cursor steps immediately on this marker.
This is how you can use the marker track ,so you can be more productive and efficient in your home studio. Leave your comments below and let me know if you are already using marker track in your projects and if not if you tried it now that you read this post.
Σχόλια