

Automation: What is it and how it works
- Evmorfos Kasinakis

- 5 Φεβ 2020
- διαβάστηκε 3 λεπτά

As I have said so many times from here and in my videos ,all DAWs are the same with a few changes in their interface. They include functions that are really very helpful tools for our recordings and for our mixes also.
Today we are going to talk about automation and how it works. If we want a definition of this term it is exactly what it says. We automate some moves and we get better results. I will try to explain this to you with more details.
There are sometimes , where you have found a good balance in your mix ,but there are some spots in your project ,that something doesn’t sound so good! Let’s be more specific! For example, we have a mix and we have set a very good level of volume in all of our tracks , and we are very satisfied with the result. In the chorus , though, in some spots the main vocal isn’t so loud as it should be, because there are some loud guitar parts. What can you do? You can easily turn up the volume fader of the main vocal, but then you will have a louder main vocal in the entire song. This is something you don’t want.
For that reason we are going to use automation. With this function we can increase the volume of a track for a specific period of time , just to be heard like you want to, to emphasize a phrase of an instrument and then we can get it back to the level it was.
How can we do this? It’s very simple and you will understand it right away. In the mixer of you DAW ,on every track there are two buttons with the initials W and R. W stands for Write and R for Read. Once I press the W button , R button is activated too.

This way I can record any move I make on this track until I stop playback. For example, in the chorus of my song I want to increase the volume of the main vocal and then set it back where it was. We activate W and R automatically , we start playback and we can do any changes we want. When we are ready ,we stop playback ,we deactivate the W button and as we can see the R button stays highlighted, activated. When we start playback again we can see that every move we made on this track has been recorded on the time we did it.

Another way to apply automation on a track is exactly the same ,but this time from the track list and not from the mixer. In Cubase on the left bottom corner there is a little down arrow which says Show /Hide automation.

By pressing this arrow ,the track expands and we can see the automation workflow. From there I can do the exact same things I did on the mixer.
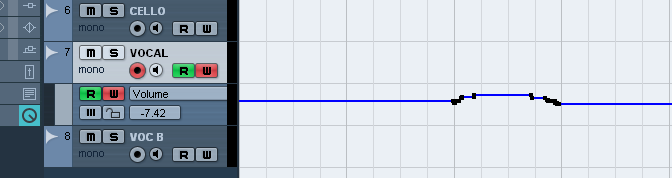
I choose the pencil from the tools bar , or pressing number 8 (for key shortcut) ,and I can draw the volume change I want in any part of my project. When I am ready ,I start playback ,after I have deactivated W button.

There are so many ways to do automation ,but today I wanted to talk about the simple volume automation and we can apply this technique in other automations.
Leave your comments below ,share this post if it was helpful for you and mail me any questions you may have
Σχόλια